Read over your rubrics
(self-evaluation) for this task before you complete the activities. Click on
the arrow and use the BACK button on your browser to return to this page and
continue. 
Before you begin this task, be sure to practice
the skills you learned in Part I. Click on the arrow to go over
Part I.
Part II.
Part III.
In
this task, you'll add transitions to your slides. You also add a final slide to your show.
Open
the presentation you saved in Part III. [Remember that you can go back and forth between this page
and your presentation. Just press the ALT key and click the TAB key on your
keyboard.]
ACTIVITY I: Add
Slide Transitions 
Let's add
some transitions to your slides.
STEP
1: Select the Slide Sorter View  .
You see all of your slides listed.
.
You see all of your slides listed.
STEP
2: Select the first slide. Go to SLIDE
SHOW->SLIDE TRANSITION.

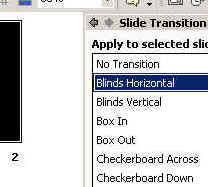
STEP
3: When you see the panel show up, select
BLINDS HORIZONTAL. That means that when you show the presentation, you
first slide with come up with that transition.
STEP
4: Now select the second and third slides,
and give them different transitions. [It is not a good idea to use a
different transition for each slide, but we are just playing here.]
STEP
5: Now select the first slide, and click the
SLIDE SHOW BUTTON. As you click on each slide, you'll notice them come in with
different transitions!
Go back to the SLIDE
SORTER View and play with different transitions. When you are finished playing,
select one transition for all of the slides [CONTROL + A selects
all).
 When you finish, SAVE your presentation.
ACTIVITY II: Add a New Slide
STEP
1: In the a SLIDE SORTER
VIEW, right-click
anywhere on the BLANK screen, and select NEW SLIDE.
[You can also press CONTROL + M on your keyboard, or got to
INSERT-> NEW
SLIDE on your menu bar.
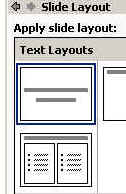
STEP
2: A new slide will appear with the panel
asking you to choose a layout. Select the Title page
layout with two text boxes.
STEP 3: Double
click on the blank slide, which will take you to the Normal View where you can
work. If the left-hand panel is open, listing your slides, close it (X).
STEP 4: In
the first text box, type "JUST A LITTLE ABOUT ME!"
STEP
5: In the second text box, write "THE
END."

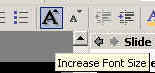
STEP
6: Now drag your cursor across the words THE
END to select them. Once the words are selected, click several times on the
large "A" icon on your toolbar. You'll see the text increase in size.
STEP
7: Keep the text selected and go to the
"A" with the color bar on the toolbar.
Click on the arrow next to it, select MORE COLORS, and choose a gold color for
your text.

Your
last slide should look something like the slide below.

SAVE your presentation.
Go back to your first slide, click the SLIDE SHOW
button, and play your whole presentation, clicking through each slide and the animations you
added to the text.
FINISH:
When you finish, go to the SLIDE SORTER VIEW. GO TO FILE->PRINT. When you
printer options come up, select HANDOUTS from the
"Print What" window. Then select FOUR Slide Per
Page. Be sure to select the Black and White option on
your printer unless you want colored pages.
When
you press OK, the printer will print the Slide Sorter view
with your four slides
on one page.
Sign your page and place it in
your folder as your final PP project!
If
you completed this project with friends, play your presentations to each other.
GO
TO READING/WRITING ACTIVITY
GO
TO MATH ACTIVITY
Complete
the Rubrics, print and date the Rubrics page, and place it in your folder.
Congratulations!
You've learned something new today!!! You've also completed your Power
Point project!
This is just a beginning. You can now play with
more tools in Power Point. Save your final presentation, then go to SAVE
AS under FILE on the menu bar, and
save it again as "myplay." Now you can play with your new file without
hurting your original presentation.
You can
add sounds, automatic play features, charts, special effects and much more. Keep
experimenting and asking for help. And have a great time!
PP Task 1|
PP Task 2 | PP Task 3 | PP
Task 4